Setup Hugo with hestiaHUGO - ZORALab's Hestia Module
The very beginning of to setup Hugo Git repository with hestiaHUGO. A step-by-step guide ZORALab's Hestia Hugo module from scratch.
Learning Objectives
At the end of this tutorial, you will learn:
How to setup Hugo compatible Git Repository
How to download and setup hestiaHUGO
How to start a hugo server for development
How to use git along the way
Understanding The hestiaHUGO Way
Like any Hugo theme, hestiaHUGO supplies UI in its very unique way. However, unlike any other themes, hestiaHUGO comes with its own data processor system and rarely use most of Hugo features except its partial functions and image processing functions. The main reason is because Hugo has a lot of output inconsistences throughout its history. ZORALab been there the hard way and will never make the same mistake twice. Along the web development journey, we picked a lot of different lessons and values along the way. So, before you decide to move forward, let's be clear about some notable non-compromising differences:
1. You won't be using Markdown; or even frankenstiening it with Hugo's
   shortcode like Hugo recommended.

2. Design strongly for writing HTML and Go template functions (equipped with
   Hugo partial functions) for maximum portabilities.

3. HTML, CSS, and JS are treated as 1 single format: **WEB**. We do not split
   them like most CSS and JS frameworks did.

4. We are still complying to the browser's end-user rendering degredation rule
   (HTML-only ➔ HTML+CSS only (e.g. JS blocker) ➔ HTML+CSS+JS), carrying no
   assumption of visitors' browsing nature.

5. All page layouts are supplied at UI component level, each with its own web
   formats (HTML, CSS, CSS Variables, JS).

6. We **COMPILE** pages; not just rendering. Each page is contained on its own.

7. At page layout level, we prioritizes HTML+CSS approach, especially when the
   very powerful CSS variables is made available.

8. We are extremely data-driven due to multiple languages support and even
   supply our own data type+value sanitization functions.
Download the Latest Package
Let's start by downloading the latest package from the ZORALab's Hestia releases
portal in its offical website via the link below. Keep in mind that you're
looking for hestiaHUGO.
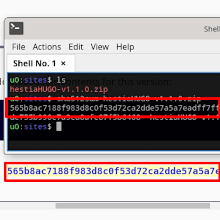
Check the Package Integrity
To make sure you had downloaded a proper and correct package, we recommend you
to check the package integrity before use. The are 2 ways to do this:
GPG or SHASUM. In this tutorial, we will be using
SHASUM as shown in the following code snippet. This should generate
a HASHED_VALUE mathematically. Your job is to make sure the
HASHED_VALUE is 100% exactly the same as displayed at the releases
portal.
# IN UNIX OS (LINUX / MACOS)
# --------------------------
$ sha512sum hestiaHUGO-vNNNN.zip
...
[HASHED_VALUE]


# IN WINDOWS OS
# -------------
$ certutil -hashfile hestiaHUGO-vNNNN.zip sha512
...
SHA512 hash of hestiaHUGO-vNNNN.zip:
[HASHED_VALUE]
Setup Git Repository
Now that you the package ready, it's time to setup your git repository. Firstly,
create and initialize your Git repo directory (for this entire tutorial, we're
calling it DemoHestia). In it, you can create your hugo directory
(by default, we recommend sites). Then, proceed to create a
themes directory inside it. Once done, unzip the hestiaHUGO package
into the themes directory. The results should be something as such:
DemoHestia/
└── sites/
    └── themes/
        └── hestiaHUGO/
            ├── config/
            ├── server.cmd
            ├── ...
            └── ... all other content ...
Setup Hugo Config Directory
Due to the engine design complexities, hestiaHUGO ships its config/
directory and a Hugo server server.cmd starter script by default
inside the hestiaHUGO theme directory as part of the package.
You will have to move it out to the hugo directory (sites/) in
order to properly use it. The result should be something as such:
DemoHestia/
└── sites/
    ├── server.cmd
    │
    ├── config/
    │   ├── _default/
    │   │   ├── caches.toml
    │   │   └── config.toml
    │   ├── development/
    │   │   └── config.toml
    │   └── production/
    │       └── config.toml
    │
    └── themes/
        └── hestiaHUGO/
            └── ... all theme content ...
Configure Hugo
With Hugo's critical files in-place, it's time to configure Hugo. Generally
speaking, you only need to edit the 1st section of the
__sites/config/_default/config.toml file. The rest are as it is as
noted by the comments. You would want to setup baseURL to the
output base URL you're planning to publish and that's it. You may refer to
Hugo's config manual in the link below to learn more about each fields.
DemoHestia/
└── sites/
    ├── ...
    │
    ├── config/
    │   ├── _default/
    │   │   ├── ...
    │   │   └── config.toml
    │   │
    │   └── ...
    │
    └── ...

           ⤋

# CONFIGURE THESE DATA
# ====================
baseURL = "https://hestia.zoralab.com"
theme = [
        "hestiaHUGO",
]
timeout = '10m'

archetypeDir = "archetypes"
contentDir = "content"
assetDir = "assets"
dataDir = "data"
staticDir = [
        "static",
]
layoutDir = "layouts"
themesDir = ".."
publishDir = "public"
i18nDir = "i18n"


# ╔════════════╗
# ║!!  STOP  !!║
# ╚════════════╝
!!! That's it. Don't go beyond here. You might break hestiaHUGO. !!!
...
Start Hugo Server
With everything setup ready, it's time to start a server. Due to Hugo's
inconsistency, hestiaHUGO does its optimizations and workaround wrapped under
a single server.cmd script. While you can start the server as
guided by Hugo, we strongly discourage you to do so. You can explore and
read the script we did to learn more.
$ cd sites/         # if you haven't do so
$ ./server.cmd
Visit the Preview URL Site
With the server running properly, you can visit the website using your browser in the computer. Since we have not build anything, you should expect a blank page or a page that keeps on redirecting to the language-specific 404 pages. At this stage, you got a working Hugo repo with hestiaHUGO set nicely.
Git Commit
Before starting to create any content, we advise you to git commit at this point in case of future revert needs. Now let's be clear: commit the hestiaHUGO theme together as opposed to many folks said. This is a rendering UI engine which is more than just supplying UI codes. It's not safe to detach it from your Hugo.
$ git add .
$ git commit -s

----
root: initialized hugo for site creation.

There is a need to initialize a hugo repository for building
the static website. Hence, we have to start the efforts before
building any web content. Let's do this.

This patch is created to initialize hugo in the repository.


Signed-off-by: Smith, John ❬[email protected]❭
----

$ git push
About Updating hestiaHUGO
In the future, in case you need to update the hestiaHUGO, you just need to
replace your themes/hestiaHUGO directory with the updated package.
Hugo reconfiguration is not required unless the release note specify it.
Remember that updating the engine may break your edge-cases inline customization
so while we try not to break backward compatibilty, you should allocate some
times to audit all your content pages' UI are updated with the latest API calls.
DemoHestia/
└── sites/
    │
    ├── ...
    │
    └── themes/
        └── hestiaHUGO/     🡨 just replace this directory
            └── ...
What's Next?
Now that we had completed the hestiaHUGO setup, the next step is to create a simple page. Here's the URL for the next step.
Create Basic and Placeholder Hugo PagesEpilogue
Looks like we have arrived to the last station. Intrigued to get in touch? Please feel free to start contacting us via the following public channels:
GitHub Discussion Portal